Did you know you can customize IBM Planning Analytics Workspace directory installation? It’s getting more and more common to have a small C:\ drive for booting and then having a separate drive to store data. This approach makes it easier to have a backup work only with the relevant drive(s).
The Docker installation for Planning Analytics Workspace on Windows Server 2016 installs files to the C:\ directory without giving users the option to change the directory. Even if the PAW folder is unzipped to another drive, the images will still get loaded to the Docker default directory. This uses between 20 and 25 GB of storage when all is said and done!
You can, however, manually change these settings by manually creating a few files via the following steps:
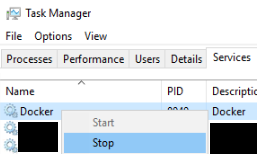
- Stop the docker service either via PowerShell command or in Task Manager.

- In windows powershell, create a new daemon.json file by typing:
- New-Item -ItemType file -Name daemon.json -Path c:\programdata\docker\config

- New-Item -ItemType file -Name daemon.json -Path c:\programdata\docker\config
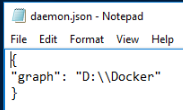
- Open the daemon.json file and add the following content:{“graph”:”D:\\Docker”
}

- Note: Replace “D:\” with whatever drive you wish to use.
- Restart the docker service either via PowerShell command or in Task Manager.Before:

After:

The main thing to note is that images will still be created in C:\ and then ported to D:\. For this reason, you’ll see ~20-25gb of caching when installing Planning Analytics Workspace. This means that you need at least 20-25gb of extra space on the C:\ drive. After the install, that space will open up again!
IBM Planning Analytics is full of new features and functionality. Not sure where to start? Our team here at Revelwood can help. Contact us for more information at info@revelwood.com. And stay tuned for more Planning Analytics Tips & Tricks weekly in our Knowledge Center and in upcoming newsletters!

