Manually uploading transactions into Workday Adaptive Planning is a useful method for adding data outside of automated integrations. Here are the steps you need to take to do this:
Step 1: Edit the columns that will appear in your transaction report by navigating to Model Management > Transactions.
Step 2: You can add various text or dimension columns that will be displayed when you drill into transactions.
Step 3: After you add the necessary columns, you are ready to upload transactions.
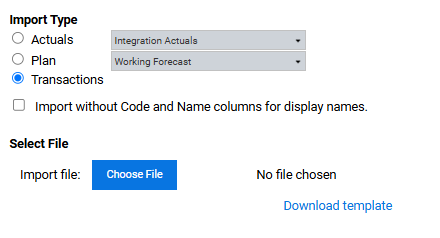
Step 4: To get the correct import template, you go to the Import Data section under Integration. Before you select “Download template.” you want to make sure you have the transaction option selected as seen below.
Step 5: Once that is selected, you can import transactions.
Step 6: You will be prompted to map any unmapped accounts, levels or dimensions.
Step 7: The last screen you will see before importing is an option to “Delete Existing Transactions.” This will delete all transactions in Adaptive, even the ones outside the level you are importing too.
You may need to do multiple imports, because there is a limit on how many Adaptive will take in one upload file.
Revelwood is more than just a Platinum Workday Adaptive Planning partner — we’re a trusted advisor to the Office of Finance. With 30 years of experience and award-winning expertise, we bring together powerful software, proven best practices and pre-built, ready-to-deploy solutions that accelerate time to value. Our team doesn’t just implement technology — we help finance teams transform the way they plan, analyze and make decisions. Discover how Revelwood can help you get the most out of Workday Adaptive Planning — and achieve results that matter.
Read more Workday Adaptive Planning Tips & Tricks:
How to Use the Audit Trail feature in Web Reporting
Cumulative Translation Adjustment Accounts
Workday Adaptive Planning Tips & Tricks: Virtual Version – Report Toggling