• Skip to main content
  • Skip to footer
Revelwood Logo

Revelwood

Your SUPER-powered WP Engine Site

  • Who We Are
    • About Us
      • Our Company
      • Our Team
      • Partners
    • Careers
      • Join Our Team
  • What We Do
    • Solutions
      • Workday Adaptive Planning
      • IBM Planning Analytics
      • BlackLine
    • Services
      • Implementation Services
      • Customer Care
        • Help Desk
        • System Administration as a Service
      • Training
        • Workday Adaptive Planning Training
        • IBM Planning Analytics / TM1 Training
    • Products
      • DataMaestro
      • LightSpeed
      • IBM Planning Analytics Utilities
  • How We Help
    • Use Cases
    • Client Success Stories
  • How We Think
    • Knowledge Center
    • Events
    • News
  • Contact Us

IBM Planning Analytics

IBM Planning Analytics Tips & Tricks: Year-to-Date Hierarchies

July 10, 2018 by Lee Lazarow Leave a Comment

Tips & Tricks

Did you know you can create a single hierarchy that contains all year-to-date values within an entire year?

As you know, TM1 is a consolidation tool which is designed to sum together a series of values.  There are many ways to create the consolidations using a combination of grand totals and sub totals.  This blog specifically addresses the year-to-date (YTD) hierarchy associated with a time dimension.

Many clients prefer to create a single hierarchy that contains all YTD values within an entire year.  The following image shows an example of this for a model that separates month and year as two separate dimensions:

Creating year to date hierarchies in TM1

This approach allows users to drill into the values one month at a time to show both the previous YTD value and the value for the month.  But what happens if you want to see all of the details associated with YTD-Dec?  If a user wants to see each of the 12 months and the total then the user is required to drill 12 times and also see a series of subtotals along the way.

Instead of creating a single hierarchy, Revelwood recommends that a series of YTD calculations are created.  Each consolidated total consists of a single consolidated elements with a series of base level values below it.  The YTD totals are then consolidated into a grouping-consolidation called “Total YTD”.

For example, a group called “Total YTD” will contain children called Jan YTD, Feb YTD, etc.  Jan YTD will consist of one base level element (Jan) and Feb YTD will consist of two base level elements (Jan and Feb).  The “Total YTD” element will never be used for reporting since it serves solely as a grouping element, but the other various YTD elements will allow user to click once to see all of the details within the total.

Learn how to create year to date hierarchies in TM1

This approach shows the same subtotals as the initial approach while simplifying the drilling requirements.  As your users become more involved with ad-hoc analysis, they will appreciate the simplicity to dig into the details via a single click.

This method can also be expanded to use other time consolidations such as fiscal year (FY), ROY (rest of year) and TTM (trailing twelve months).

IBM Planning Analytics  is full of new features and functionality.  Not sure where to start?  Our team here at Revelwood can help. Contact us for more information at info@revelwood.com.  And stay tuned for more Planning Analytics Tips & Tricks weekly in our Knowledge Center and in upcoming newsletters!

Read more IBM Planning Analytics Tips & Tricks:

IBM Planning Analytics Tips & Tricks: GMT vs Local Time

IBM Planning Analytics Tips & Tricks: Captions

IBM Planning Analytics Tips & Tricks: Regions with Planning Analytics Rules

Home » IBM Planning Analytics » Page 35

Filed Under: IBM Planning Analytics Tips & Tricks Tagged With: Analytics, Budgeting Planning & Forecasting, Financial Performance Management, IBM Planning Analytics, TM1

IBM Planning Analytics Tips & Tricks: Three Reserved Local Variables in TurboIntegrator

July 3, 2018 by Revelwood Leave a Comment

Tips & Tricks

This is a guest post from Revelwood’s Jay Apwah. 

Did you know that there are reserved local variables that you can use in TurboIntegrator scripts?

Reserved local variables are variables that do not need to be defined and are destroyed when the process finishes executing. This blog will describe three variables: Value_is_String, nValue, and sValue. You will not find these on the variables tab and you cannot re-define them, but they are accessible.  These three variables can be accessed within the Metadata or Data tabs of TurboIntegrator.

Value_is_String

This local variable can be used to test if the value of the data source cube view record that is currently being processed is a number. Value_is_String returns 0 (zero) if the value is a number. Otherwise, the value is a string.

NValue and SValue

In the variables tab of a standard TurboIntegrator process, you can define each variable as numeric or string. With this approach, however, you must set the variable type of the value to string. This is shown in variable #7 of the image below:

Example

In this example, assume the source view contains string and numeric measures. Rather than creating separate views that contain only numeric values or only string values, you can check to see if each value is a string or number. Line 7 in the image below shows an example of the check. Lines 8 and 10 show the appropriate functions and reserved variables to use. Note the distinction between sValue and nValue.

Reserved local variables in TurboIntegrator

In the variables tab, it was ok to set the variable type as string because TM1 knows that “sValue” means string and “nValue” means numeric and will therefore perform any required conversions.

As you can see, you can utilize the Value_is_String, nValue, and sValue local variables described above to create a more compact, efficient and less error-prone approach.

IBM Planning Analytics is full of new features and functionality. Not sure where to start? Our team here at Revelwood can help. Contact us for more information at info@revelwood.com. And stay tuned for more Planning Analytics Tips & Tricks weekly in our Knowledge Center and in upcoming newsletters!

Read more IBM Planning Analytics Tips & Tricks:

IBM Planning Analytics Tips & Tricks: TurboIntegrator Logging

IBM Planning Analytics Tips & Tricks: New Parameters for TurboIntegrator

IBM Planning Analytics Tips & Tricks: Ensuring Cube Logging is Reset in TM1

Home » IBM Planning Analytics » Page 35

Filed Under: IBM Planning Analytics Tips & Tricks Tagged With: Analytics, Budgeting, Budgeting Planning & Forecasting, Financial Performance Management, IBM Cognos TM1, IBM Planning Analytics, TM1

IBM Planning Analytics Tips & Tricks: TM1 Web Writeback Protection

June 26, 2018 by Revelwood Leave a Comment

Tips & Tricks

This is a guest post from Revelwood’s Shane Bethea.

Did you know that you can prevent data entry to TM1 in TM1 Web websheets? Here are a couple of different ways to do this.

The first approach can be used for input templates. Use this approach when you want your users to be able to enter data for certain cells/columns, but not others. By default, every cell in an Excel worksheet has the ‘Locked’ property set. This property has no effect on the cell unless the sheet or workbook is protected. In this example, we can select certain cells of an input template to be enterable and certain cells to be locked down or protected. To unlock certain cells in the template, right click the cells and select Format Cells. In the Format Cells dialogue box, select the Protection tab, uncheck the Locked checkbox, and select OK.

tm1 web writeback protection

Now, in the ‘Review’ ribbon in Excel, select Protect Sheet, and then click OK.

Learn about TM1 Web writeback protection

Your worksheet is now protected. Any cell with the Locked property checked will prevent data entry to TM1 in TM1 Web. Any cell with the Locked property unchecked will allow data entry to TM1 in TM1 Web.

The second approach to disallow data entry to TM1 in TM1 Web can be used for reports. Use this approach when you don’t want your users to be able to enter data at all. To do this, in TM1 Server Explorer, expand Applications and navigate to the report you want to protect. Right click the report and select Properties.

prevent data entry in TM1 Websheets

In the TM1Web Properties box, there is a checkbox called ‘Allow Cell Write Back from Web’ that is checked by default. Unchecking this box will make the file read only and will prevent writing any data into TM1. Once you’ve made your changes, select OK.

Learn how to prevent data entry in TM1 Websheets

After making any of these changes, you must close the websheet in TM1 Web, refresh the navigation tree and reopen your report.

IBM Planning Analytics is full of new features and functionality. Not sure where to start? Our team here at Revelwood can help.  Contact us for more information at info@revelwood.com. And stay tuned for more Planning Analytics Tips & Tricks weekly in our Knowledge Center and in upcoming newsletters!

Home » IBM Planning Analytics » Page 35

Filed Under: IBM Planning Analytics Tips & Tricks Tagged With: Analytics, Budgeting Planning & Forecasting, Financial Performance Management, IBM Planning Analytics, Planning & Reporting, TM1

Top 5 IBM Planning Analytics Tips & Tricks

June 25, 2018 by Lee Lazarow Leave a Comment

Tips & Tricks

Every week we publish a new blog post on IBM Planning Analytics Tips & Tricks. Some of these focus on how to use new features in IBM Planning Analytics and others explain how to optimize key aspects of the core TM1 engine.

We took a look at our analytics (yes, we don’t just implement analytics, we use them too!) to see which blog posts with tips & tricks are the most popular with Revelwood clients and visitors to Revelwood’s Knowledge Center. Here are our most popular blog posts on IBM Planning Analytics and TM1.

1. Working with the TM1 REST API

In this blog post, Nina Gordy, a consultant in our Professional Services Group (PSG), delivers tips on working with the TM1 REST API. Nina worked extensively with the REST API while she was on the development team for Quantum, our TM1 mobile application for system administrators.

2. Displaying Data in Maps

Lee Lazarow, our FPM technical director, details how to easily visualize data in IBM Planning Analytics Workspace. He explains the three easy steps you need to take in order to turn your data into a map.

3. Turbo Integrator Logging

In this blog post, also written by Lee, we provide tips on logging with Turbo Integrator. The proper use of logging can help minimize the amount of disk space needed in your environment and may also help improve the efficiency of your data load processing.

4. Using MDX to Compare Dimensions Hierarchies

MDX, which stands for multidimensional expressions and is similar to SQL, is for multidimensional data in OLAP cubes. TM1, however, has a unique implementation of MDX. Shane Bethea, also a consultant in PSG, explains how TM1 dimensions often have multiple hierarchies that should all roll up to the same total. But sometimes they get out of sync. This is where MDX comes in – it can be used to see if both hierarchies contain the exact same number of n-level customers, and, if the two hierarchies are out of sync, it can identify the elements causing the problem.

5. Making Default Cube Views with MDX

Jay Apwah, a consultant in PSG, also wrote a post on MDX. His post covers how you can easily update a cube value to control the period elements that will display in a subset used in views. The concept he covers in this post can be applied in many different ways.

Want more tips & tricks on working with IBM Planning Analytics and TM1? Visit our Knowledge Center on a regular basis

Home » IBM Planning Analytics » Page 35

Filed Under: IBM Planning Analytics Tips & Tricks Tagged With: Analytics, Budgeting Planning & Forecasting, Financial Performance Management, IBM Planning Analytics, TM1

IBM Planning Analytics Tips & Tricks: Planning Analytics for Microsoft Excel (PAx) VBA API Calls

June 19, 2018 by Revelwood Leave a Comment

Tips & Tricks

This is a guest post from Revelwood’s Shane Bethea.

Did you know IBM Planning Analytics lets you make API calls through VBA in Planning Analytics for Microsoft Excel (PAx)? You probably know that action buttons can be used to refresh or rebuild reports in PAx. But what if you want to refresh the data in your report as part of a VBA routine? Maybe there are more tasks you want to perform through VBA and then you want to refresh the data as the last step. IBM offers the ability to make API calls through VBA in PAx with just a few steps.

The first step is to open the Visual Basic editor in Excel and import two files (one module and one class module) that ship with your PAx installation. Do this in the VBA editor by right clicking on your workbook and selecting Import File.

Make VBA API calls through PAx

This opens an Import File dialogue box. Navigate to your PAx install location (either Program Files or Program Files (x86) ) and then navigate to \ibm\cognos\IBM for Microsoft Office\Automation\ .

You can then import two files: ‘CognosOfficeAutomationExample.bas’ and ‘CognosOfficeMessageSuppressor.cls’.

Learn how to make VBA API calls with PAx

Once imported, you can use the public sub routines in the CognosOfficeAutomationExample module. This module includes some useful sub routines, such as:

  • ClearAllData() – Functions the same as the Clear All Data toolbar/ribbon button to clear Explorations and reports from the workbook.
  • RefreshAllData() – Functions the same as the Refresh All Data toolbar/ribbon button to refresh data for Explorations and reports in the workbook.
  • RefreshAllDataAndFormat() – Functions the same as the Refresh All Data toolbar/ribbon button to refresh data and formats for Explorations and reports in the workbook.
  • UnlinkAllData() – Functions the same as the Convert to Static toolbar/ribbon button to unlink all data in the workbook.

If you want to Refresh or Rebuild a Dynamic Report in PAx (formerly Active Forms in TM1 Perspectives), you have to get more creative. To accomplish this, follow the steps to import the two modules discussed earlier and then add the below code to the CognosOfficeAutomationExample module:

How to make VBA API calls with PAx

Now you can call the RebuildDynamicReport() sub routine from a Command Button or other VBA macro to rebuild your Dynamic Report.

IBM Planning Analytics is full of new features and functionality. Not sure where to start? Our team here at Revelwood can help. Contact us for more information at info@revelwood.com. And stay tuned for more Planning Analytics Tips & Tricks weekly in our Knowledge Center and in upcoming newsletters!

Home » IBM Planning Analytics » Page 35

Filed Under: IBM Planning Analytics Tips & Tricks Tagged With: Analytics, Budgeting Planning & Forecasting, Financial Performance Management, IBM Planning Analytics, Planning & Reporting, TM1

Tech Bulletin: PAx Incompatibility Caused by Latest Microsoft Office Update

June 18, 2018 by Revelwood Leave a Comment

News and events

This is a technical bulletin from Revelwood’s Steve Ellis.

Did you know that the latest version of Microsoft Office 365 caused Planning Analytics for Microsoft Excel (PAx) to become unusable?  I will show you how to determine if you have been impacted and how to resolve this.

Root Cause:  This is not an issue with PAx.  This incompatibility was caused by the latest Microsoft Office update in May 2018.  IBM has logged the issue with Microsoft, and although Microsoft is working on a fix, there is not a resolution date at this time.

Symptoms:  After connecting, your Task Pane will appear completely grey.  You will not be able to navigate the Task Pane in any way.  Please see the image below that illustrates the issue:

PAx Incompatibility Caused by Latest Microsoft Office Update

Resolution:  You will need to revert your version of Microsoft Office 365 to the latest stable copy.  To do so, please follow the below directions:

  1. Turn off Automatic Excel Updates (File > Options > Update Options > Click “Disable Updates”)Learn about the PAx Incompatibility Caused by Latest Microsoft Office Update
  2. Open the Command Prompt as Administrator
  3. Paste this into the Command Prompt and then hit Enter:  cd %programfiles%\Common Files\Microsoft Shared\ClickToRun
  4. Paste this into command prompt and then Enter:  exe /update user updatetoversion=16.0.9029.2253

The above actions will revert your Microsoft Office 365 to the last stable version, and PAx will now work as intended.

Need help resolving this issue?  Revelwood is standing by and ready to assist you!  Please contact us at info@revelwood.com.

Home » IBM Planning Analytics » Page 35

Filed Under: Tech Bulletins Tagged With: Analytics, Budgeting Planning & Forecasting, Financial Performance Management, IBM Cognos TM1, IBM Planning Analytics

Embracing Continuous Planning

June 18, 2018 by Lisa Minneci Leave a Comment

News & Events

The old school annual budgeting and planning process is just that – old school. Today’s forward-thinking FP&A executives, managers, and analysts instead are embracing continuous planning and rolling forecasting. Rolling forecasting is the process of simulating profit and loss for a company on a rolling basis. Many FP&A executives who’ve led their company’s transition from the inefficient annual budgeting process to one of continuous planning and rolling forecasting will tell you it was one of the bst decisions they’ve made for their company.

One of the biggest challenges with the traditional approach of developing an annual plan or budget is that as the year goes on, you end up making decisions based on the reality of your business from two, three, or even more quarters ago. You are not able to factor in recent changes in your business or your market. You don’t have the ability to quickly react to disruptions in the market or to new opportunities that you did not foresee months ago.

Continuous planning gives you the ability to quickly react and respond to all the unforeseen changes in your business, and to do so in a way that reflects the current reality of your business. It provides a methodology for forecasting at frequent intervals throughout the year, and enables managers to see trends, patterns and “breaks in the curve” long before your competitors. It is the singular most powerful tool to help your line-of-business managers and senior executives make better informed decisions regarding your products and your market.

Jim Collins, performance management strategy executive at IBM and Guy Jones, worldwide technical sales executive, IBM Performance Management, will be discussing continuous planning and rolling forecasting in a webinar on Thursday, June 21, 2018 at 11am ET. They’ll explain how implementing a system of continuous planning and rolling forecasts can help your organization:

  • Increase the timeliness, accuracy and insightfulness of plans, budgets and forecasts
  • Address emerging threats and embrace new opportunities more proactively
  • Improve profitability and operating performance.

Jim and Guy will also show a demo of IBM Planning Analytics to show how multidimensional modeling is a key enabler of continuous planning, helping you update and revise your forecasts quickly and easily.

It’s time to leave the past behind and start your journey toward more efficient and effective business planning.

Learn more about continuous planning and rolling forecasting:

Beyond Budgeting: The Case for Rolling Forecasts

Home » IBM Planning Analytics » Page 35

Filed Under: News & Events Tagged With: Analytics, Beyond Budgeting, Budgeting Planning & Forecasting, Financial Performance Management, IBM Planning Analytics, TM1

IBM Planning Analytics Tips & Tricks: How to Make Action Button Messages Dynamic

June 12, 2018 by Revelwood Leave a Comment

Tips & Tricks

This is a guest post from Revelwood’s Jay Apwah.

Did you know that in Planning Analytics for Microsoft Excel (PAx) and Perspectives you can customize action button messages? Well you can go one step further and make those messages dynamic.

In this blog, we will walk through the following steps:

  1. Setup cells in a PAx workbook for the custom messages.
  2. Edit an action button to use the custom messages.

In this example, we have a PAx worksheet that allows users to click an action button to run a TI process using two parameters: the name of a file to load, the period to which the data will be loaded in a cube called bpmFinance. Whenever this process is executed, it logs statistics into a control cube: Number of records in the source file and Number of skipped records.

Below are the custom messages that we want to be shown to the user upon clicking the action button:

  • Confirmation message: “Are you sure you want to load the <file name> into the <period> period?”
  • Success message: “Process completed successfully – <X of X> records loaded”
  • Failure message: “Process failed. Records in file: <X>. Skipped Records: <Y>

Step 1: Setup custom messages

In any row that can be hidden, use a combination of Excel and TM1 worksheet functions to construct the custom messages. In this example, we will end up hiding rows 13-15. This is where our custom messages are constructed.

Figure 1: Example of formula to construct the confirmation message.

Make action buttons in IBM Planning Analytics dynamic

Formula:

=”Are you sure you want to load the “&C4&” file into the “&C5&” period?”

Figure 2: Example of formula to construct the success message.

Learn how to make action buttons in IBM Planning Analytics dynamic

Formula:

=”Process completed successfully – “&DBR(“<server>:bpmControls”, “Value”, “GL Actual File – Total Count”)&” of “&DBR(“<server>:bpmControls”, “Value”, “GL Actual File – Total Count”)&” records loaded.”

Note: The formula above retrieves the process statistic: “GL Actual File – Total Count” from a cube called bpmControls.

Figure 3: Example of formula to construct the failure message.

Making action buttons in IBM Planning Analytics dynamic

Formula:

=”Process failed. Records in file: “&DBR(“HQCorp:bpmControls”, “Value”, “GL Actual File – Total Count”)&”. Skipped records: “&DBR(“HQCorp:bpmControls”, “Value”, “GL Actual File – Skipped Count”)

Note: The formula above retrieves the process statistics: “GL Actual File – Total Count” and “GL Actual File – Skipped Count” from a cube called bpmControls.

Step 2: Edit action button to use the custom messages

  • In the properties of the action button that runs the TI process, click “Options”How to make action buttons in IBM Planning Analytics dynamic
  • The default success, failure and confirmation messages are displayed.
dynamic action buttons in IBM Planning Analytics
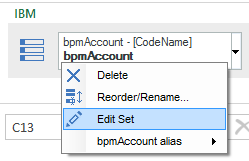
  • Since the custom confirmation, failure and success messages are in cells C13, C15 and C14, respectively. Change the default messages from hard-coded words to the appropriate Excel references as shown below.
making dynamic action buttons in IBM Planning Analytics

Result

Dynamic confirmation message

Now when the “Run” action button is clicked, a confirmation message appears. The confirmation message is dynamic and picks up the parameter values entered/selected by the user.

learn about dynamic action buttons in IBM Planning Analytics

Dynamic success message

When the confirmation is accepted, if the process completes successfully, the dynamic success message would appear. Notice how the success message displays the statistics that the process logged in the control cube.

how to make dynamic action buttons in IBM Planning Analytics

Dynamic failure message

When the confirmation is accepted, if the process failed, the dynamic failed message would appear. Notice how the success message displays the statistics that the process logged in the control cube.

making dynamic action buttons in IBM Planning Analytics

IBM Planning Analytics is full of new features and functionality. Not sure where to start? Our team here at Revelwood can help. Contact us for more information at info@revelwood.com. And stay tuned for more Planning Analytics Tips & Tricks weekly in our Knowledge Center and in upcoming newsletters!

Home » IBM Planning Analytics » Page 35

Filed Under: IBM Planning Analytics Tips & Tricks Tagged With: Analytics, Budgeting Planning & Forecasting, Financial Performance Management, IBM Planning Analytics, TM1

IBM Planning Analytics Tips & Tricks: Customizing PAW Directory Installation on Windows Server 2016

June 5, 2018 by Alex Needham Leave a Comment

Tips & Tricks

Did you know you can customize IBM Planning Analytics Workspace directory installation? It’s getting more and more common to have a small C:\ drive for booting and then having a separate drive to store data. This approach makes it easier to have a backup work only with the relevant drive(s).

The Docker installation for Planning Analytics Workspace on Windows Server 2016 installs files to the C:\ directory without giving users the option to change the directory. Even if the PAW folder is unzipped to another drive, the images will still get loaded to the Docker default directory. This uses between 20 and 25 GB of storage when all is said and done!

You can, however, manually change these settings by manually creating a few files via the following steps:

  1. Stop the docker service either via PowerShell command or in Task Manager.Learn how to install IBM Planning Analytics Directories
  2. In windows powershell, create a new daemon.json file by typing:
    • New-Item -ItemType file -Name daemon.json -Path c:\programdata\docker\config
      Customizing PAW Directories Installation on Windows Server 2016
  3. Open the daemon.json file and add the following content:{“graph”:”D:\\Docker”

    }

    Learn how to customize installing PAW directories for Windows Server 2016

    • Note: Replace “D:\” with whatever drive you wish to use.
  4. Restart the docker service either via PowerShell command or in Task Manager.Before:Understanding installing PAW directories

    After:

    Learn how to customize the installation of PAW directories

The main thing to note is that images will still be created in C:\ and then ported to D:\. For this reason, you’ll see ~20-25gb of caching when installing Planning Analytics Workspace. This means that you need at least 20-25gb of extra space on the C:\ drive. After the install, that space will open up again!

IBM Planning Analytics is full of new features and functionality. Not sure where to start? Our team here at Revelwood can help. Contact us for more information at info@revelwood.com. And stay tuned for more Planning Analytics Tips & Tricks weekly in our Knowledge Center and in upcoming newsletters!

Home » IBM Planning Analytics » Page 35

Filed Under: IBM Planning Analytics Tips & Tricks Tagged With: Analytics, Budgeting Planning & Forecasting, Financial Performance Management, IBM Planning Analytics, TM1

  • « Go to Previous Page
  • Page 1
  • Interim pages omitted …
  • Page 33
  • Page 34
  • Page 35
  • Page 36
  • Page 37
  • Interim pages omitted …
  • Page 39
  • Go to Next Page »

Footer

Revelwood Overview

Revelwood helps finance organizations close, consolidate, plan, monitor and analyze business performance. As experts in solutions for the Office of Finance, we partner with best-in-breed software companies by applying best practices guidance and our pre-configured applications to help businesses achieve their full potential.

EXPERTISE

  • Workday Adaptive Planning
  • IBM Planning Analytics
  • BlackLine

ABOUT

  • Who We Are
  • What We Do
  • How We Help
  • How We Think
  • Privacy

CONNECT

World Headquarters

Florham Park, NJ | 201 984 3030

European Headquarters

London & Edinburgh | +44 (0)131 240 3866

Latin America Office

Miami, FL | 201 987 4198

Email
info@revelwood.com

Copyright © 2025 · Revelwood Inc. All rights reserved. Revelwood® and the Revelwood logo are registered marks of Revelwood Inc.